Indoor Compost for Apartments: A Beginner’s Guide to Vermicomposting
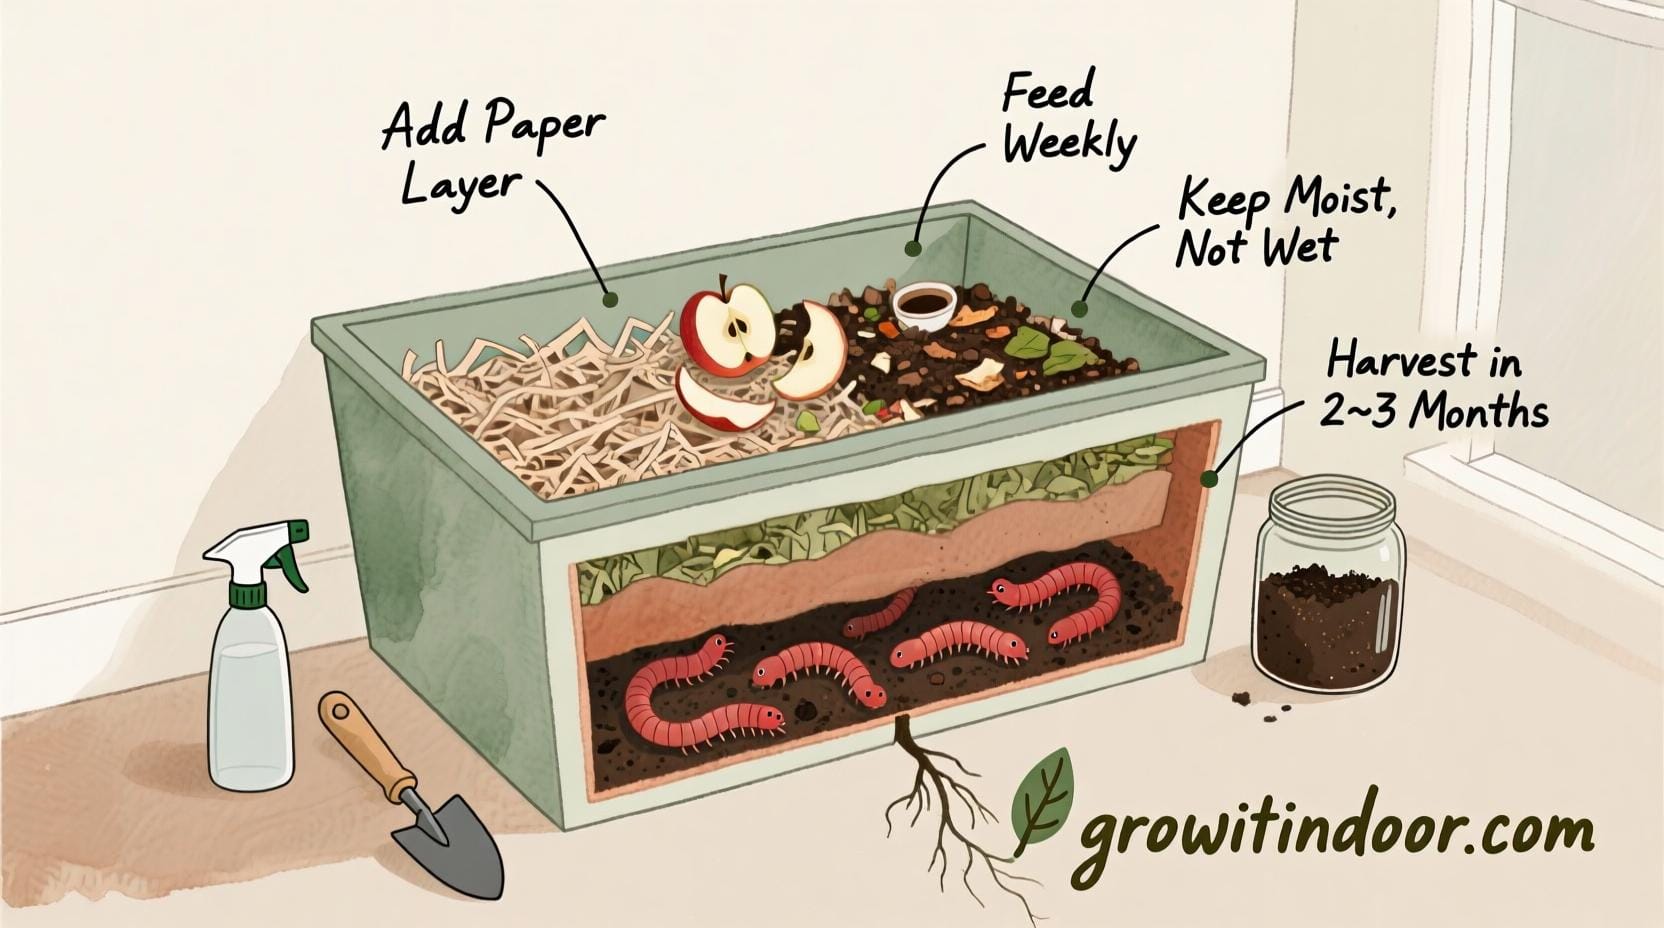
Table of Contents
- Why Indoor Compost for Apartments is a Game-Changer
- What is Vermicomposting?
- Indoor Compost vs. Outdoor Compost: Why Apartments Need a New Approach
- Getting Started: Your First Indoor Compost Bin
- What to Feed (and What to Avoid) Your Worms
- Maintaining Your Indoor Compost System
- Harvesting Your Black Gold: Using Vermicompost
- Compost Tea Recipe: Liquid Gold for Your Plants
- Creative Ways to Use Indoor Compost in Small Spaces
- FAQ: Indoor Compost for Apartments
- Conclusion: Grow Green, Even in the Smallest Space
You’ve just finished making your morning smoothie. The blender is wiped clean, the glass is in the sink, and now you’re staring at a pile of banana peels, apple cores, and coffee grounds. Your instinct? Toss it in the trash. But deep down, you know that’s not the end of the story.
That food waste will sit in a landfill for years, slowly releasing methane—a gas far more damaging than carbon dioxide. And you’re left wondering: Is there a better way?
There is. And it starts right under your kitchen sink.
Indoor compost for apartments is no longer a niche idea for eco-warriors. It’s a practical, odor-free, space-saving solution for anyone who wants to live sustainably—without a backyard. And the best method? Vermicomposting, the art of using worms to turn your scraps into rich, nutrient-packed soil.
If you’ve ever dreamed of growing herbs on your windowsill, filling your balcony with tomatoes, or simply reducing your environmental footprint, this guide is your starting point. No green thumb required. Just a small bin, a few red wigglers, and the willingness to rethink what “waste” really means.
Let’s dig in.
Why Indoor Compost for Apartments is a Game-Changer
You live in a city. Your space is limited. There’s no yard, no garden shed, maybe not even a balcony. But that doesn’t mean you can’t participate in the composting revolution.
Every year, the average American throws away over 200 pounds of food waste. In cities, that waste ends up in trucks, then landfills, where it decomposes anaerobically and releases methane. According to the Environmental Protection Agency, food is the single largest category of material in landfills—making up nearly 24% of municipal solid waste.
But here’s the good news: you can intercept that waste stream. Right in your apartment.
Indoor compost for apartments allows you to close the loop. Instead of sending organic matter to rot underground, you transform it into something valuable—vermicompost, also known as worm castings. This dark, crumbly material is packed with nutrients and beneficial microbes that supercharge plant growth.
Studies from the Cornell Waste Management Institute show that worm castings contain up to five times more nitrogen, seven times more phosphorus, and 1,500% more beneficial bacteria than regular topsoil. That’s not just dirt—that’s plant gold.
And the best part? It doesn’t smell. It doesn’t attract pests. And it fits in the same space as your recycling bin.
Whether you’re nurturing a few houseplants or dreaming of a lush balcony garden, indoor compost gives you the power to grow healthier plants while shrinking your carbon footprint.
What is Vermicomposting?
Let’s get one thing straight: vermicomposting isn’t just “composting with worms.” It’s a biological process powered by nature’s most efficient recyclers—red wigglers (Eisenia fetida).
These aren’t the earthworms you find in your yard after a rainstorm. Red wigglers thrive in decomposing organic matter, not deep soil. They’re social, fast-eating, and reproduce quickly—perfect for apartment-scale composting.
Here’s how it works: you provide a moist, aerated bin filled with bedding (like shredded paper or coconut coir). You add food scraps. The worms eat the scraps and bedding, digest them, and excrete castings—tiny pellets of nutrient-rich humus.
This process doesn’t require heat, sunlight, or physical effort. Unlike traditional composting, which relies on bacterial decomposition and can take months, vermicomposting is faster, quieter, and completely manageable indoors.
The result? A steady supply of organic fertilizer that’s ideal for indoor plants, container gardens, and even hydroponic systems.
And because it happens in a sealed container, there’s no mess, no odor, and no need to worry about attracting pests—as long as you manage it correctly.
So if you’ve ever thought composting was too messy, too smelly, or too complicated for apartment life, vermicomposting might just change your mind.
Indoor Compost vs. Outdoor Compost: Why Apartments Need a New Approach
You might be wondering: Can’t I just use a regular compost bin?
The short answer: not really—not in an apartment.
Traditional composting requires space, airflow, and a balance of greens and browns that’s hard to maintain in a small, enclosed environment. It also generates heat and can attract rodents, fruit flies, and neighbors’ complaints.
But indoor compost for apartments is designed for urban living. It’s compact, contained, and built to function year-round—regardless of weather or space constraints.
Let’s break it down:
| Feature | Outdoor Composting | Indoor Compost for Apartments (Vermicomposting) |
|---|---|---|
| Space Required | Yard or patio | Fits under a sink or in a closet |
| Odor | Can smell if unbalanced | Odor-free when managed properly |
| Pest Risk | Attracts rodents, flies | Sealed bins prevent pests |
| Speed | 2–6 months | 2–3 months (faster with worms) |
| Temperature Dependent | Yes (needs heat) | Works year-round indoors |
| Ideal for | Households with yards | Renters, urban dwellers, beginners |
As you can see, vermicomposting is tailor-made for small-space living. It doesn’t require drilling, building, or permission from your landlord. You can set it up in an afternoon and start feeding it the same day.
And unlike outdoor piles, it won’t dry out in summer or freeze in winter. Your worms will thrive at room temperature, quietly doing their job while you go about your life.
If you’re serious about sustainable living but limited by space, indoor compost for apartments isn’t just an option—it’s the smartest choice.
Getting Started: Your First Indoor Compost Bin
Ready to start? Here’s how to set up your first vermicomposting system—step by step.
Step 1: Choose the Right Worm Bin
You’ve got three main options:
- Pre-Made Bins
- Worm Factory 360: Stackable trays make harvesting easy. Great for beginners.
- Urban Worm Bag: Breathable fabric promotes airflow and prevents compaction.
- Can O Worms: Classic design with a spigot for leachate collection.
- DIY Plastic Bin
- Use two 10-gallon storage totes.
- Drill 1/4-inch holes in the lid and upper sides for ventilation.
- Place one bin inside the other to catch excess liquid.
- Countertop Composters (Not for Worms)
- Devices like the Lomi or Vitamix FoodCycler break down scraps quickly but don’t produce true compost.
- Best used as a supplement, not a replacement.
For most apartment dwellers, a stackable worm bin or a DIY tote system offers the best balance of cost, efficiency, and ease of use.
Step 2: Get the Right Worms
You can’t just grab worms from your garden. You need red wigglers (Eisenia fetida), which are specially adapted to live in organic waste.
Where to buy:
- Uncle Jim’s Worm Farm – Reliable, fast shipping, beginner kits available.
- Modern Steader – Offers educational bundles for urban composters.
- Local garden centers or composting workshops.
Start with 1 pound of worms (about 1,000 individuals). They’ll eat roughly half their weight in food each day, so 1 lb = ½ lb of scraps daily.
Step 3: Prepare the Bedding
Worms don’t live in soil—they live in bedding. Think of it as their home and first meal.
Best bedding materials:
- Shredded newspaper (non-glossy, black ink only)
- Cardboard (remove tape and labels)
- Coconut coir (retains moisture well)
- A handful of garden soil or finished compost (adds beneficial microbes)
How to prepare:
- Soak bedding in water until damp.
- Squeeze out excess moisture—should feel like a wrung-out sponge.
- Fluff and place in the bin.
- Mix in a small amount of soil.
- Let it sit for 24 hours before adding worms.
Once the bedding is ready, gently add your worms on top. They’ll burrow down within minutes to avoid the light.
Now you’re ready to feed.
What to Feed (and What to Avoid) Your Worms
Feeding your worms is where many beginners go wrong. Too much, too often, or the wrong kind of food can lead to odors, pests, or dead worms.
The key is balance.
The Greens and Browns Rule
Like all composting, vermicomposting relies on a balance of greens (nitrogen-rich) and browns (carbon-rich).
| Greens (Feed Sparingly) | Browns (Add Regularly) |
|---|---|
| Fruit scraps (apple, banana) | Shredded paper |
| Vegetable peels (carrot, lettuce) | Cardboard |
| Coffee grounds & filters | Paper towels |
| Tea bags (staple-free) | Dry leaves (if available) |
| Crushed eggshells | Sawdust (untreated) |
Ideal ratio: 2 parts browns to 1 part greens.
Always bury food scraps under the bedding to prevent fruit flies and odors. Use a small trowel or your hands to dig a hole, add scraps, and cover them.
Foods to Avoid
🚫 Never feed your worms:
- Meat, fish, or dairy (causes smell and attracts pests)
- Oily or greasy foods (slows decomposition)
- Citrus peels (too acidic)
- Onions, garlic, and hot peppers (toxic in large amounts)
- Pet waste or diseased plants (pathogens)
Stick to mild, plant-based scraps. Over time, you’ll learn what your worms prefer.
Maintaining Your Indoor Compost System
Your bin isn’t a “set it and forget it” system. It needs weekly attention to stay healthy.
Weekly Maintenance Checklist
- ✅ Add food every 2–3 days – Start with small amounts and increase as the population grows.
- ✅ Check moisture – If the bedding feels dry, mist with water. If it’s soggy, add more browns.
- ✅ Fluff the bedding – Prevent compaction by gently stirring with a fork.
- ✅ Monitor for pests – Fruit flies mean food is exposed. Cover scraps with cardboard.
- ✅ Add crushed eggshells monthly – Helps balance pH and provides calcium.
Troubleshooting Common Issues
| Problem | Likely Cause | Solution |
|---|---|---|
| Bad smell | Too wet or too many greens | Add browns, improve airflow |
| Fruit flies | Exposed food | Bury scraps, use a vinegar trap |
| Worms crawling out | Unhappy environment | Check moisture, pH, and food |
| Slow breakdown | Not enough worms or food | Add more worms or reduce scraps |
A healthy bin should smell like a forest floor—earthy and fresh. If it doesn’t, adjust your inputs and give it a few days.
Harvesting Your Black Gold: Using Vermicompost
After 2–5 months, your first batch of compost will be ready.
How do you know it’s done? The material will be dark, crumbly, and free of recognizable food scraps. The worms will have migrated to newer layers (if using a stackable bin) or deeper into the bedding.
Harvesting Methods
- Light Separation
Push all contents to one side. Add fresh bedding and food to the empty side. Wait 1–2 weeks. Worms will move over. Harvest the old side. - Dump and Sort
Empty the bin onto a tarp under bright light. Worms burrow down. Scoop off compost layer by layer. - Tray Migration (Stackable Bins)
Add a new tray on top with fresh bedding. Worms naturally move upward. Harvest the lower tray.
Once harvested, store compost in a sealed container or use immediately.
How to Use Vermicompost
- For houseplants: Mix 1 part compost with 3 parts potting soil.
- For balcony gardens: Use as a top dressing or mix into container soil.
- For seedlings: Blend into seed-starting mix (10–20%).
- For hydroponics: Brew into compost tea (see below).
This isn’t just fertilizer—it’s a living soil amendment that improves structure, water retention, and microbial activity.
Compost Tea Recipe: Liquid Gold for Your Plants
Want to give your plants an instant boost? Make compost tea—a liquid extract rich in microbes and nutrients.
| Ingredient | Amount | Purpose |
|---|---|---|
| Vermicompost | 1 cup | Nutrient base |
| Non-chlorinated water | 1 gallon | Solvent (chlorine kills microbes) |
| Unsulphured molasses (optional) | 1 tbsp | Feeds beneficial bacteria |
Instructions:
- Combine all ingredients in a bucket.
- Stir daily for 2–3 days.
- Strain through cheesecloth.
- Use within 48 hours.
Apply to soil or as a foliar spray. Dilute 1:10 for delicate plants.
Learn more about soil biology from Cornell’s Composting Resources.
Creative Ways to Use Indoor Compost in Small Spaces
Your compost isn’t just for houseplants.
- Feed your microgreens – Mix into soil for nutrient-dense harvests.
- Boost hydroponic systems – Use compost tea as a natural additive.
- Enrich balcony containers – Improve yields for tomatoes, peppers, and herbs.
- Support community gardens – Share excess compost with local growers.
You’re not just reducing waste—you’re creating a cycle. Scraps become soil. Soil grows food. Food becomes scraps. And the loop continues.
For more small-space gardening ideas, check out our guide on How to Grow Microgreens Indoors in an Apartment.
FAQ: Indoor Compost for Apartments
Q: Does indoor compost for apartments smell?
A: Only if it’s unbalanced. A healthy bin smells like fresh soil.
Q: Can I compost in a studio apartment?
A: Yes. A worm bin takes up less space than a microwave.
Q: How often should I feed the worms?
A: Every 2–3 days. Start slow and adjust based on consumption.
Q: Are worms allowed in rentals?
A: Yes. They’re not pets—just a composting tool. No legal restrictions.
Q: Can I use vermicompost in hydroponics?
A: Absolutely. Compost tea enhances microbial activity in water-based systems. See our Hydroponics for Beginners guide.
Q: How long until I get compost?
A: 2–5 months, depending on bin size and worm population.
Conclusion: Grow Green, Even in the Smallest Space
You don’t need a backyard to make a difference.
With indoor compost for apartments, you’re doing more than managing waste—you’re building soil, feeding plants, and participating in a circular economy that starts in your kitchen.
Vermicomposting is simple, quiet, and surprisingly rewarding. One day, you’ll lift the lid of your bin and see not worms, but potential. That coffee ground you tossed this morning? It’s already on its way to becoming part of a basil leaf, a cherry tomato, or a thriving peace lily.
Start small. Be patient. Let the worms do the work.
And when someone asks how you keep your plants so vibrant, you can smile and say: I feed them my garbage.
Ready to begin? Grab a bin, order some worms, and take your first step toward a greener, cleaner apartment lifestyle. The planet—and your plants—will thank you.


Thanks for sharing. I read many of your blog posts, cool, your blog is very good.
Thanks for sharing. I read many of your blog posts, cool, your blog is very good.
Thanks for sharing. I read many of your blog posts, cool, your blog is very good.
Thanks for sharing. I read many of your blog posts, cool, your blog is very good.
Thank you for your sharing. I am worried that I lack creative ideas. It is your article that makes me full of hope. Thank you. But, I have a question, can you help me?